Ogof Craig-a-Ffynnon
27 August 2018

Matt Ewles
Having been caving in South Wales for 14 years on regular occasions, I am embarrased to say that I have only ever considered Craig-A-Ffynnon (CAF) to be a Sunday bimble to Hall of the Mountain King.
Beyond there however if a huge amount more cave leading to the Promised Land. I had heard stories about it and how hard it was. I had assumed it was gruesome caving. But after a little research it all sounded perfectly pleasant, and it was finally time to venture further into this cave.
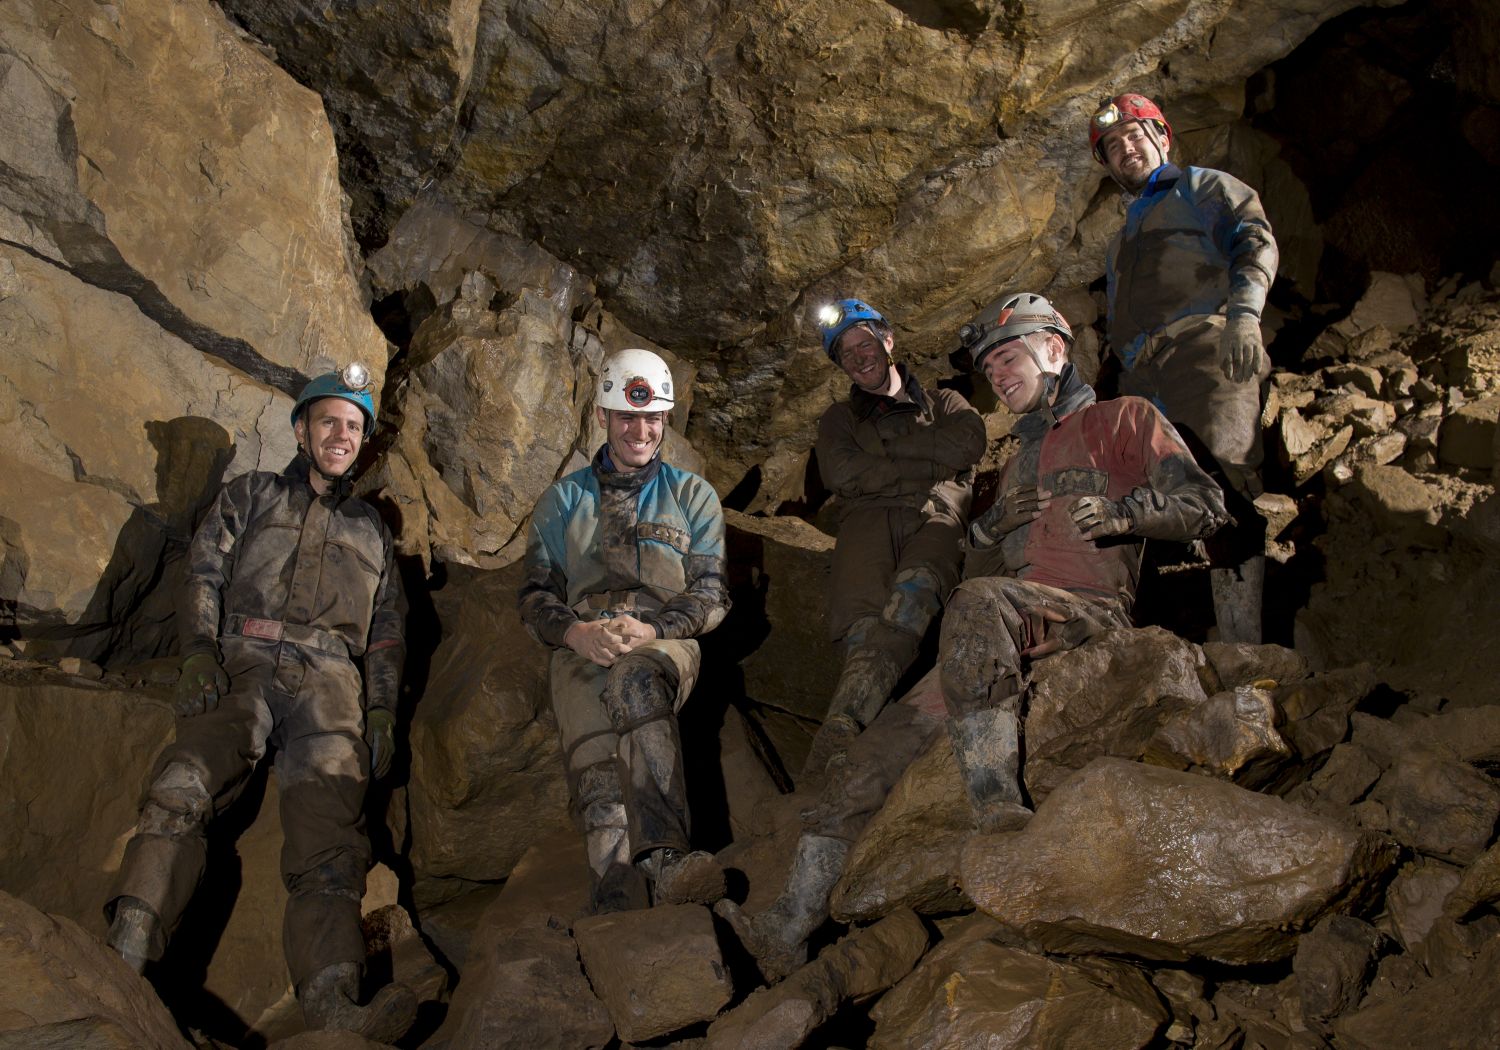
We arrived at Park Farm campsite on Friday for some beers and not too much of a late night. We were up and away and parked up for CAF by 10:30am and underground soon after. We rattled through all the fine mixture of large passages, chokes and climbs reaching Hall of the Mountain King in no time at all.
Onward the route into Hurricane Highway was easy to find, and this was followed by an easy but unexciting 200-250m of dry crawling on smooth mud. But once this was over we were into massive passage. We spent the next four hours exploring a fantastic network of huge stompy stompy excellent passages, with few routefinding issues and some stunning formations to boot.
We got almost to the end of Promised Land, to a large chamber, with only 50-100m to go to the end, which our description suggested was not worth the bother. We had time also to visit the other branches including the Pagoda formation, Helictite Rift and the Fifth Choke. We were out after a total of 8hr underground including photography.
A trip to The Promised Land is fairly long, but relatively easy caving. It is mostly big stomping passage, nothing nasty (no really tight squeezes or wet bits) and is frankly some of the most inspirational caving I've done in Wales. It stands up well against it's neighbouring systems. It was the highlight of the weekend (which as it rained Sunday and we did nothing is not hard) but was well worth the drive from York alone.

Ps. Below is a routefinding description that may be useful to anyone in the future:
Ogof Craig A Ffynnon Description
Tackle:
None for experienced groups confident in free-climbs; there are in-site ropes/ladders on all pitches including the one down to the Promised Land. A pair of cowstails on a belt will provide some reassurance on the climbs for those less confident.
Clothing:
The worst you should get in Craig A Ffynnon is wet hands/arms and feet in Gasoline Alley. Normal undersuit and oversuit are therefore fine. There is little opportunity to get cold. The cave is however extremely muddy. Kneepads and gloves essential.
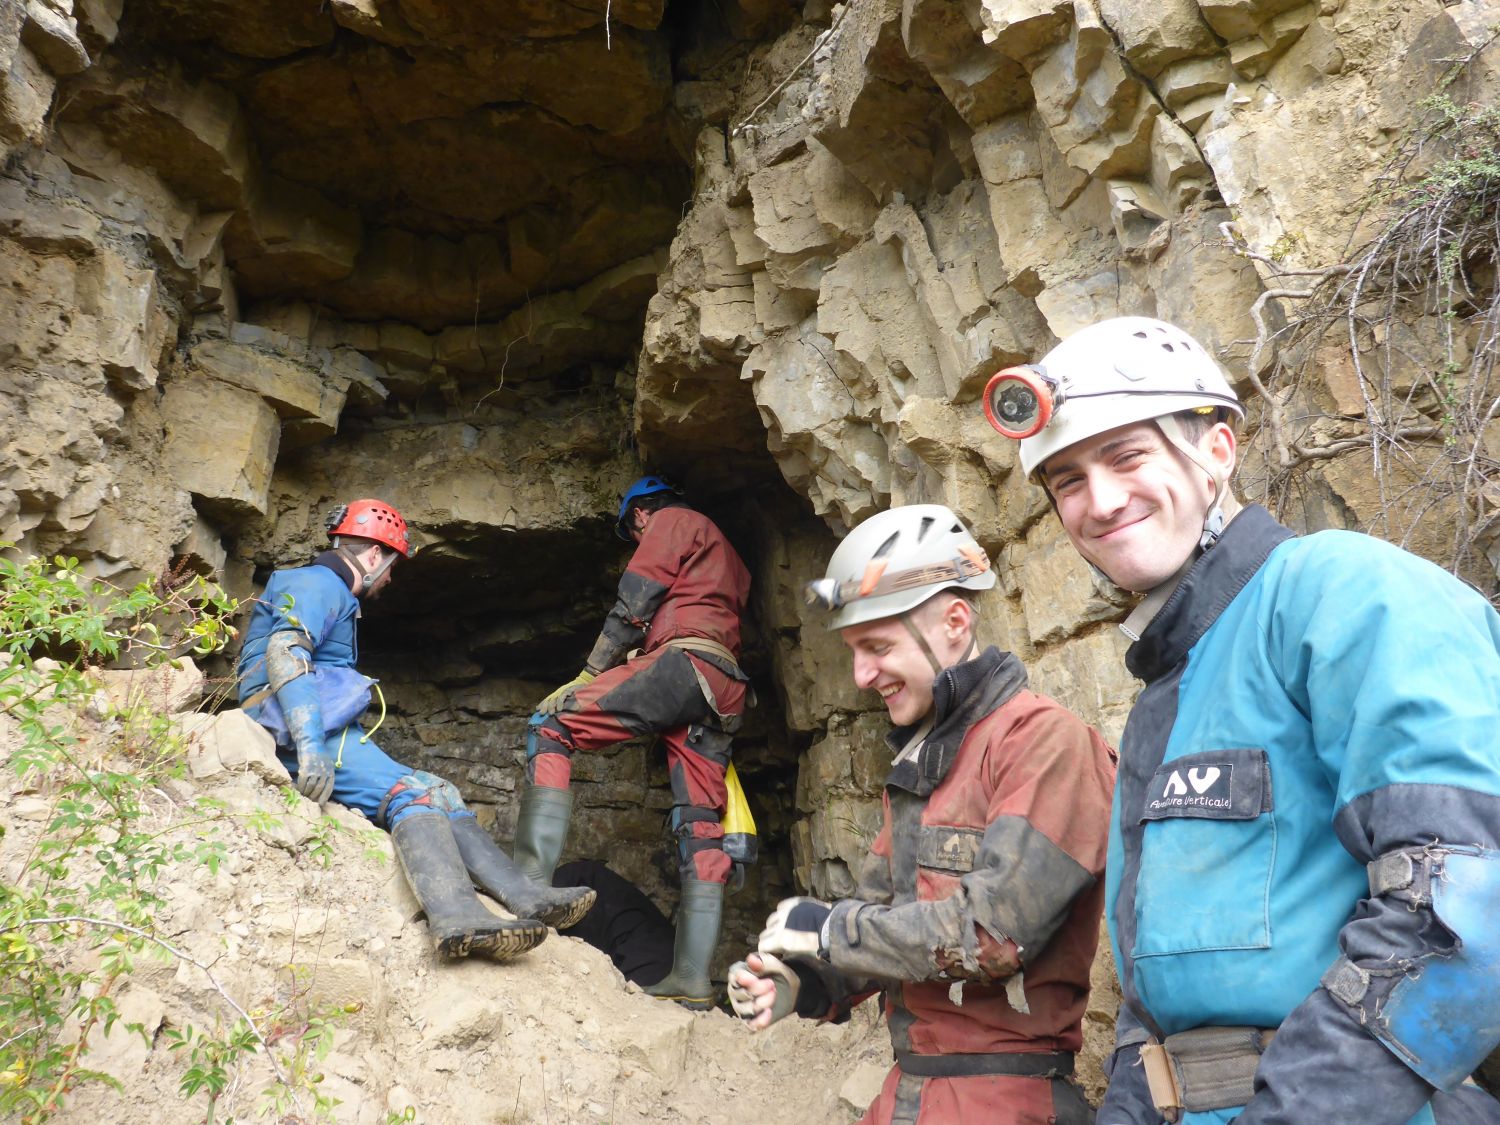
Half way along the Heads of the Valley Road (A465) from Brynmawr to Gilwern, a higher level minor road is found passing through the tiny hamlets of Blackrock and Cheltenham (aka. Clydach North). Half way between the two, where the road comes right next to (but 20m above) the A465 there is a parking layby near some iron kilns. Park here, walk east along the road for 50m and follow a path on the left which leads up to a limestone cliff. Follow the path for about 250m and you will locate the obvious entrance of Craig-A-Ffynnon a 3m scramble up into an alcove in the cliff face.
The entrance is locked, and access controlled by MLCMAC. Obtaining permission requires a complex maneuver involving sending a cheque, SAE and application form which will result in the issuing of a key (thankfully YCC have our own key as we visit South Wales quite a lot).
Through the gate, a low passage with walls of stacked deads leads to a small chamber (fill in log book). The ongoing passage reaches a second chamber with gour pools and straws. Dropping back down to the stream the passage is followed to the bottom of the First Boulder Choke where a drippy climb up an iron ladder and then scaffolding leads up into a large chamber above the choke.
Follow the most obvious taped path to reach a stream, and then the passage height decreases until a low gravel-floored hands and knees crawl in water - Gasoline Alley - is encountered. This section of passage can flood to the roof after prolonged heavy rain (but is fine in moderately damp conditions).
At the end of the wet crawl the passage enlarges and North West Inlet enters unappealingly on the left; this is a lengthy excursion in deep water for some time and is ignored here as it is a separate trip in its own right.
Beyond the North West Inlet junction the route ahead follows a low crawl uphill to reach the bottom of a pitch. An iron ladder takes you up the first 5m to a ledge where the final 5m free-climb can be made. A handline and steel plates bolted to the walls on this section assists the climb. Note that climbing down this is exposed and cowstails to clip into the in-situ ropes are recommended for less confident climbers.
A short distance ahead the passage appears to close down; but at the furthest point the way on is upward and into the Second Boulder Choke. This monster boulder choke is strenuous on the upward journey but rather fun and easy downward later (feet first on the way down, it is like a helter-skelter). The route up the choke takes a steeply ascending spiraling route with no possible wrong turns; follow the obvious worn route. Eventually this pops out into the top of a boulder slope in a chamber.
At the bottom of the chamber the way on is a low downwards crawl which leads to a taped crawl with a junction (ignore the route to the right). At this junction look behind you for where you have come from; on the return trip it is easy to miss the slope that you have come down only 3m back.
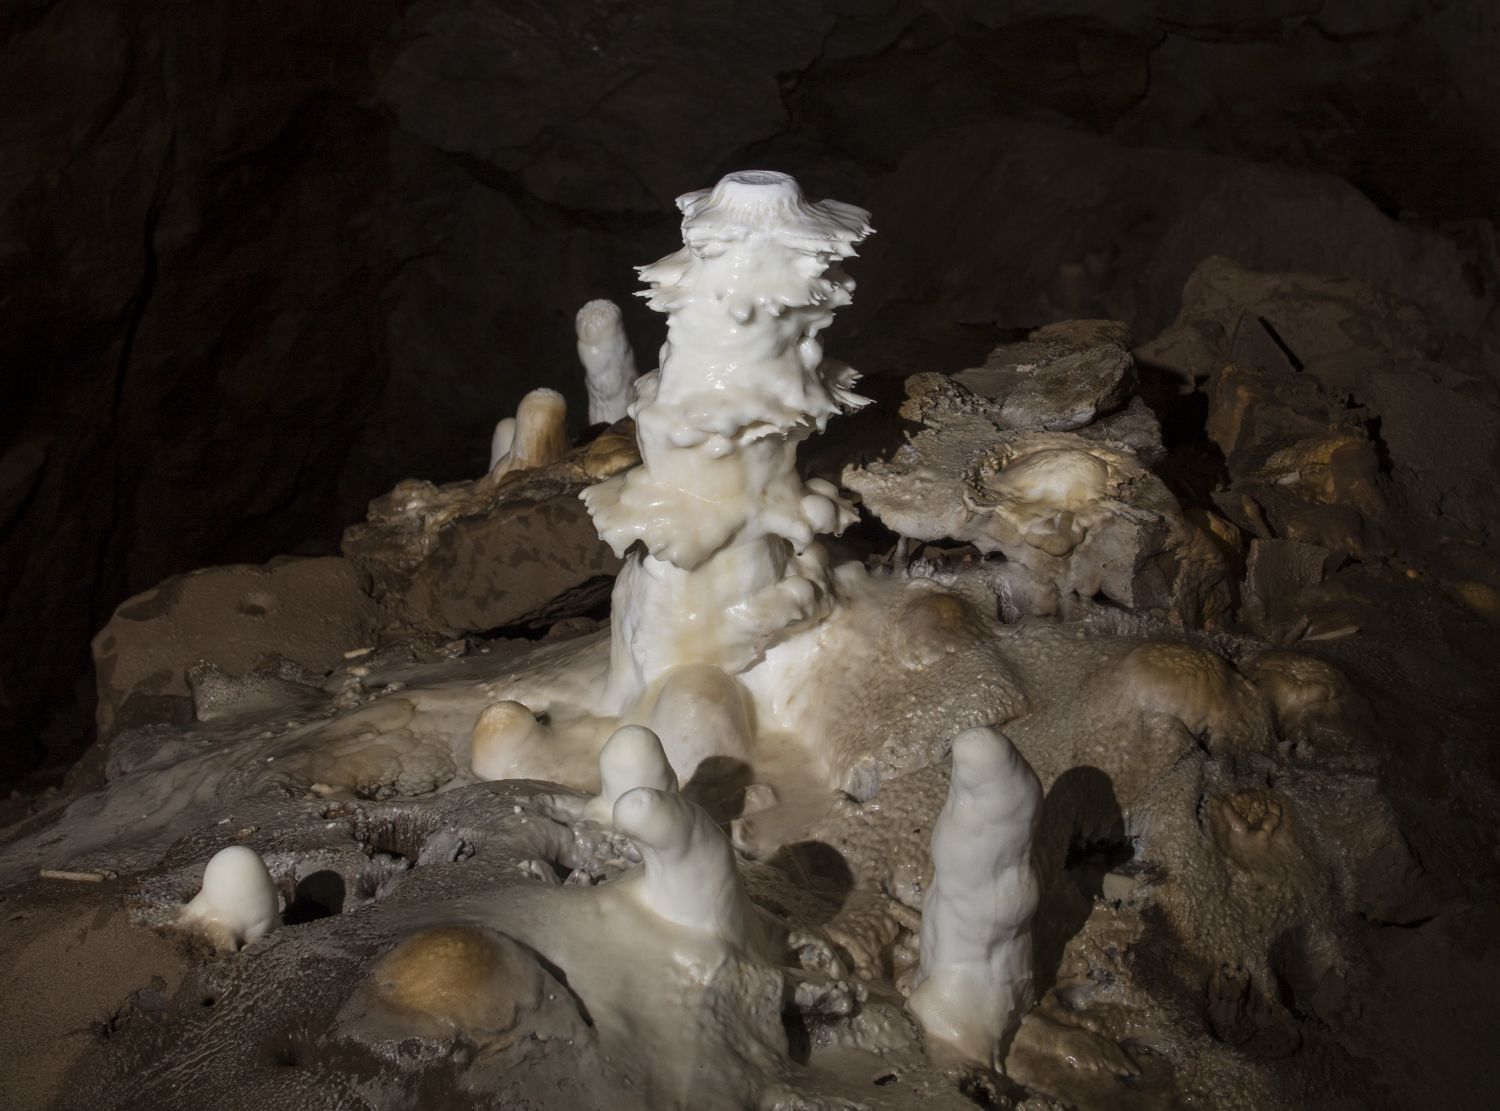
The ongoing passage has deep muddy section near its start. This passes some areas of magnificent straws, calcite pools and formations before a short ascent up boulders emerges in the top of Travertine Passage. The view along the passage from here is excellent; it is huge and vanishes off into the distance.
A short distance along Travertine Passage at a high point, a fixed rope comes down flowstone on the right wall. This leads up to a spectacular straw gallery. SRT kit required. Only very experienced and careful cavers must go up. There is little to be gained by crossing the chamber unless you are seeking to position a flash gun for photography, and anyone doing so must keep very low indeed, take immense care, and remove their wellies and oversuit. Please help preserve this chamber for future generations.
Ignoring this rope, the taped path on the left of Travertine Passage leads down a slope to reach a series of gour pools and the passage leads past yet more impressive formations including some very long straws. The passage size increases significantly on the approach to the Hall of the Mountain King, with its stunning overhead formations. Don’t forget to look behind you and up as you come around the chamber!
Keep to the taped path leading anticlockwise around the perimeter of the Hall of the Mountain King. This passes a passage on the right, which closes down after about 100 m (ignore). The taped path ends at a crawl into Hurricane Highway.
Hurricane Highway starts as a calcite floored flat out crawl which may be a little snug for some but should be manageable for most. Beyond here is a rise-up into a small chamber, and the way on is back down, keeping to the right, into an awkward crawl through a pool (or even more awkwardly to the left of the pool). Beyond here, the crawling gets easier, but continues for a fairly tedious 200m or so; approximately 15 minutes.
The crawl then relents and rapidly enlarges into the Severn Tunnel. This is a splendid, perfectly straight and beautifully formed passage with unusual undulating walls. Take a moment to admire it. This is followed for about 100m to reach a four ways junction. The passages ahead and to the left close down, while the main way is to follow the large passage to the right. A route here
The right passage enters a large section of passage with fine mud banks. The route is marked by tape. A passage off on the left leads to the Lower Series (ignore) whereas continuing ahead in the excellent large passage is the way on. The Third Choke is reached (which it little more than a pile of blocks requiring an easy ascent to roof level and then descent) and soon after this, the Fourth Boulder Choke is encountered.
The fourth choke presents itself as a huge area with a steeply ascending slope of blocks reaching all the way to the roof where all route choke. Keep to the right wall and only a short distance up the slope a well-worn route enters the choke. This goes up and down a few times before apparently ending, but the way on at the ‘end’ is upwards on the left into a large and complex boulder chamber. In this chamber, cross to the opposite wall, and the way on is a polished crawl at head height straight ahead along the left wall. The navigation through this choke is a little complex but be assured that the correct route is clearly well worn; any routes which appear to show loose or uncompacted mud or non-polished rock are not correct.
The choke opens up into a large chamber at the top of a boulder slope. The roof here commands some respect – This is not a good place to stop for your sandwiches! At the bottom of the boulders a large passage is followed, reaching after about 50-100m an obvious junction at one of the most impressive passages in the cave. Although the route to the Promised Land is on the left, it is worth also exploring right too; both are covered below.
RIGHT:
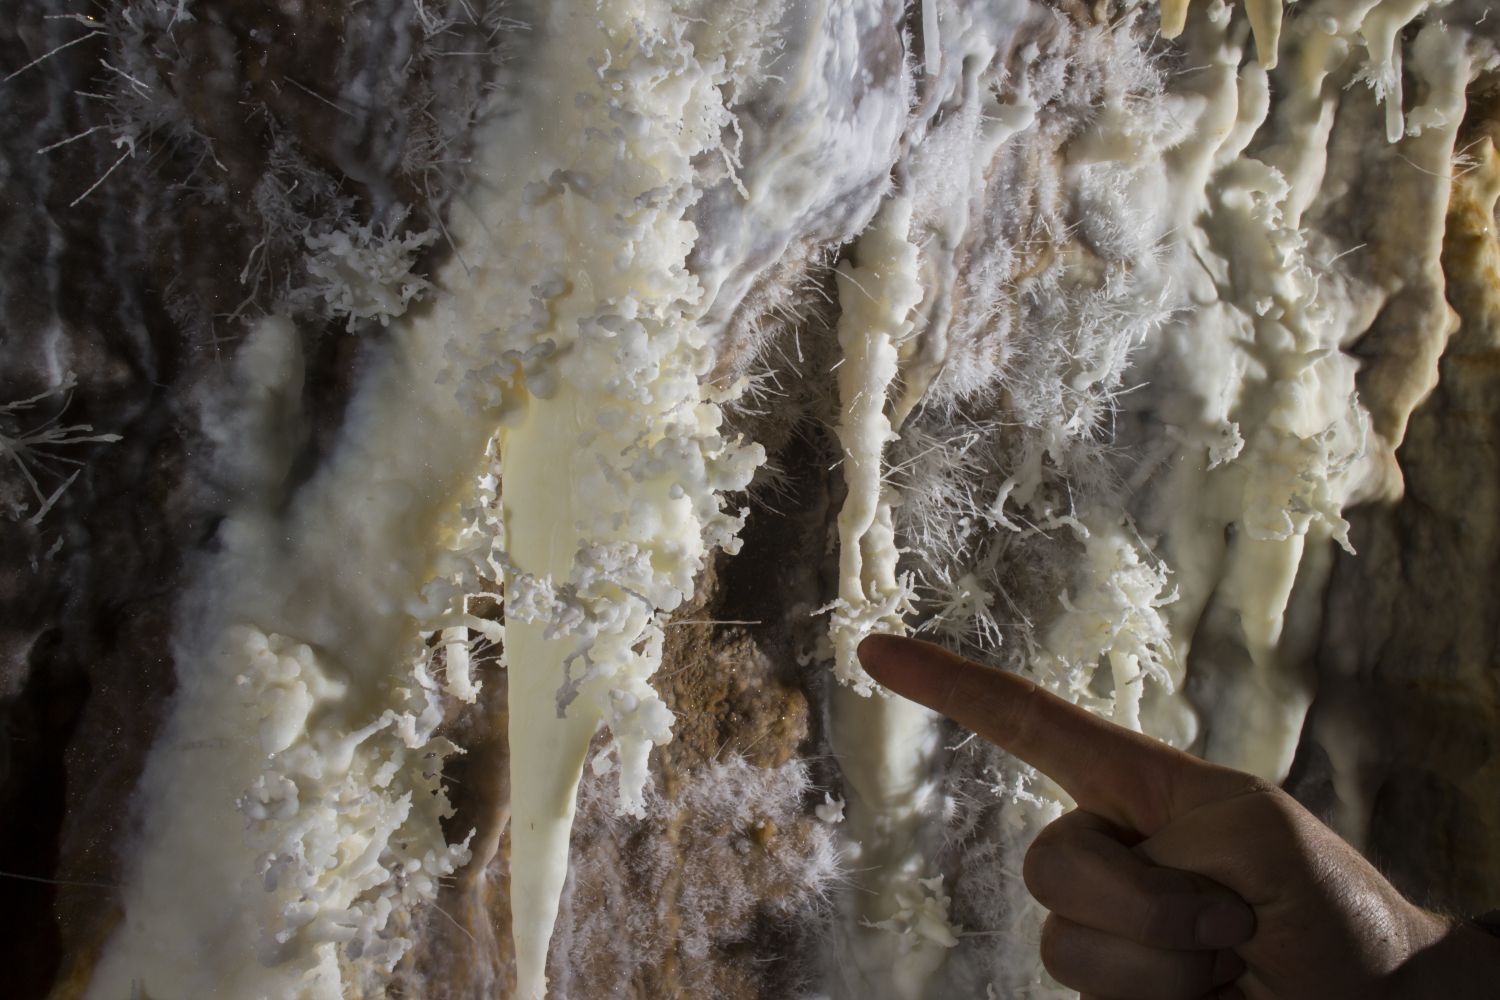
The taped route ascends and then descends boulders to reach a junction (also taped). Ahead, the passage continues for some distance in massive proportions to finally terminate at the fifth choke. At the junction, the right route leads up to some calcite formations and then into a winding passage (Helictite Rift). After 50m a sign is encountered advising extreme caution ahead and a maximum of two at a time (please respect this; it is sound advice). The passage beyond here narrows with a small stream and goes for about 40m, passing magnificent formations along the right wall. Extreme care is needed here; please crawl even though the passage height does not specifically demand it, and please avoid contact with the right wall. You will be dripping mud so keep away from the formations. The formations have survived mostly unharmed for 40 years of caver visiting but could be wiped out by just one careless move. The route ends where the rift narrows further and although more fine formations are seen ahead they are not passable without damage; turn around here!
LEFT:
The route immediately encounters a pitch. There are fixed ropes in place and confident climbers will have no trouble. Follow the rope on the right wall, but before the end, switch to a rope on the left dropping down a hole in the floor (an alternative abseil rope route is straight ahead). The hole in the floor can be easily descended thanks to a knotted rope and three metal bars that have been installed into the walls.
At the bottom the passage leads down to a large T-junction:
Left the taped route ends after 100m at a massive chamber and the unusual Pagoda formation (a 50cm high stalagmite of unusual shape). Right however is upstream and is the start of the Promised Land. This splendid passage runs for several hundred meters in mostly very impressive proportions. A trip to (nearly) the end is highly recommended.
Follow upstream (the stream is often lost under boulders). Many of the boulders are covered in mud bank deposits which is a characteristic of this passage; simply follow the taped route. Eventually, the route in the stream suddenly lowers and a duck is encountered, but just before this a shelf on the right leads into a dry oxbow bypass.
The Oxbow bypass involves about 10 minutes of slightly awkward caving in a narrow rift passage with obstructing blocks; at the time of writing a wire (used to detonate charges which ultimately connected this route back to the stream) demonstrates the route. There are no wrong turns, and the stream is eventually rejoined; take note of this point for the return journey as it is not obvious.
The stream passage is followed for a short distance before a slope up is reached and a fine calcite flow emerges from the right. Further along a 3m climb up leads to a section of passage that has calcite nodules on the lower section and gypsum crystals on the walls.
The passage gradually increases in size with a meandering stream trench (the tape eventually ends but please be observant and avoid trampling any undamaged mud banks) and continues for quite a long distance. The route is almost perfectly straight in several places; most peculiar.
Notable features along this passage include a white flowstone formation that cascades down the left wall and covers the boulders below, then two side passages 2m up on the left wall (which lead close to Daren Cilau but are dead ends) and finally a sharp right hand bend; the first such significant change in direction for ages!
Just around this bend a few calcite formations are passed and the passage narrows significantly; at the end an awkward scramble up blocks enters another large overhead chamber (10m diameter) with some polyprop rope handing from the roof. Beyond here, the route continues for another ~100m to the terminal aven, but beyond this chamber it is low, awkward and tight with little to inspire. The chamber provides the best turnaround for all but those hell-bent on getting to the very end.
Total trip time including ample stops for lunch, route-finding and photography: 8 hours underground (but could probably be done in 6-7 hours without cameras).
More articles
North York Moors valley to valley trip becomes a reality
By Matt Ewles | 13 Apr 2026
Exploration of the Excalibur MEGA extensions
By Matt Ewles | 14 Aug 2025
Excalibur streamway extended!
By Matt Ewles | 7 Aug 2025
Jenga vocally connected to River Dove valley!
By Matt Ewles | 24 Jul 2025
Dan-yr-Ogof Far North
By Matt Ewles | 27 May 2025
Brown Hill Pot
By Matt Ewles | 22 Apr 2024
Sunny Bank Holiday in Wales
By Matt Ewles | 5 Jun 2023
Avoiding the January Blues in Rift Pot
By Tash Durham | 16 Jan 2023
North Wales Slate Mines 2022
By Matt Ewles | 5 Dec 2022
Long Churn beginners trip. 10th October 2022
By Conor Morrison | 11 Oct 2022