Croesor Rhosydd
13 December 2018

Matt Ewles
Croesor Rhosydd through trip – A slate mine underground adventure.
I have done this trip several times now and now feel the need to update my description last edited in 2011 to reflect some changes to the state of this mine as of December 2018. This description should prove useful to others looking to complete the trip.
Croesor Rhosydd is a through trip from Croesor mine to Rhosydd mine. It is not a very long distance underground, but requires a number of obstacles to be passed including underground lakes and pits with a variety of in-situ ropes and wires to facilitate progress. Despite many of the required items being in-situ it is prudent to take your own ropes and boat ‘just in case’ as well as several items of emergency gear (e.g. buoyancy aid and spare rope in case anyone falls into the water).
This trip is often treated as a simple jolly, but do not underestimate the danger presented here compared to your average mine or caving trip. The in-situ ropes and wires have failed in the past and will fail again, and their condition changes massively in just the space of a year. The slate too is in a constant state of collapse. Inspect everything carefully and have backups.
See the list at the end of this report for suggested equipment to carry.
In terms of what to wear; standard caving gear is perfectly fine. Other than the walk up, you are unlikely to get too warm. If you are a large group (>8) it can get cold waiting around at each obstacle, and the entire trip can take as much as 4-5 hours, depending on how much you detour from the main route for sightseeing and photos (there is plenty to see off the trade route). You should not get wet (other than perhaps some above-welly water on exiting Rhosydd adit), but there is a strong cold breeze through the mine in winter. Dress appropriately; gloves are essential for protection.
Some people prefer to park as for neighbouring Cwmorthin and walk to Croesor from there (a longer initial walk but shorter walk back from Rhosydd). However I feel the best approach is from Croesor village.
Park at Croesor car park (free) and walked up from there; follow the road along the valley for a few hundred metres and fork right in the uphill direction. A 50-minute walk up a continuous but gentle incline eventually reaches Croesor quarry buildings. This is probably the most physically demanding part of the day! The entrance adit is located between a few buildings on the right under the cliff face, and is mostly collapsed all except a small entrance hole on the left of the passage.
Following the entrance adit for a few hundred metres through an old gate (ignoring a left turn) reaches the first area of interest - an old brick built room in the corner of a wide open chamber. Further on, on the right hand side a short passage reached an enormous flooded chamber with an eerie deep lake. Those with ample time can take their boat across to explore chambers beyond; a worthwhile diversion.
Ignore this and continue ahead to reach a climb up a walled structure (with several in-situ ropes to pull on; many of very dubious integrity).
You are then at the bottom of a long slope with a huge pipe down the left hand side. Follow this uphill, past various areas of collapse. A few windows on the right lead to a drop into the previously seen massive cathedral chamber and lake; a great view! However, the way on is to follow the slope all the way to the top, where the first pitch is found on the left.
The in-situ rope on the first pitch, as of December 2018, is in reasonable condition and the anchors are reassuring. Thank you to the installer for placing these for the benefit of everyone. The bottom of the rope has some defects and is seriously distorted, caused no doubt by people abseiling on Italian hitches. Please don’t do that folks! However, the ‘bad’ section is only reached upon floor touchdown, and the rest of the rope is in good condition. Keep well clear of the bottom as each person descends due to lots of loose slate on a shelf part way down.
We recommend taking your own rope (30m) for this just in case the in-situ rope is damaged (pull it up before use to check). You can always walk back after your trip via the Croesor entrance and run in to derig the rope (which takes only 10 minutes). The anchors are not well placed for a pull-through and this is not recommended.
A 100m scramble across the slate-strewn enormous chamber reaches a slope descending through a huge archway on the right hand side, the head of the second pitch. The in-situ rope is belayed in the most bizarre but reassuring way around several blocks. The rope drops over the edge via a deviation which holds the rope over some plastic sheeting bolted to the rock edge. The rope was in very good condition in December 2018, but again, taking your own rope (30m) is recommended in case of any damage since incurred by the in-situ rope. In general the second pitch in-situ rope has always been in better condition than the first on all my previous visits.
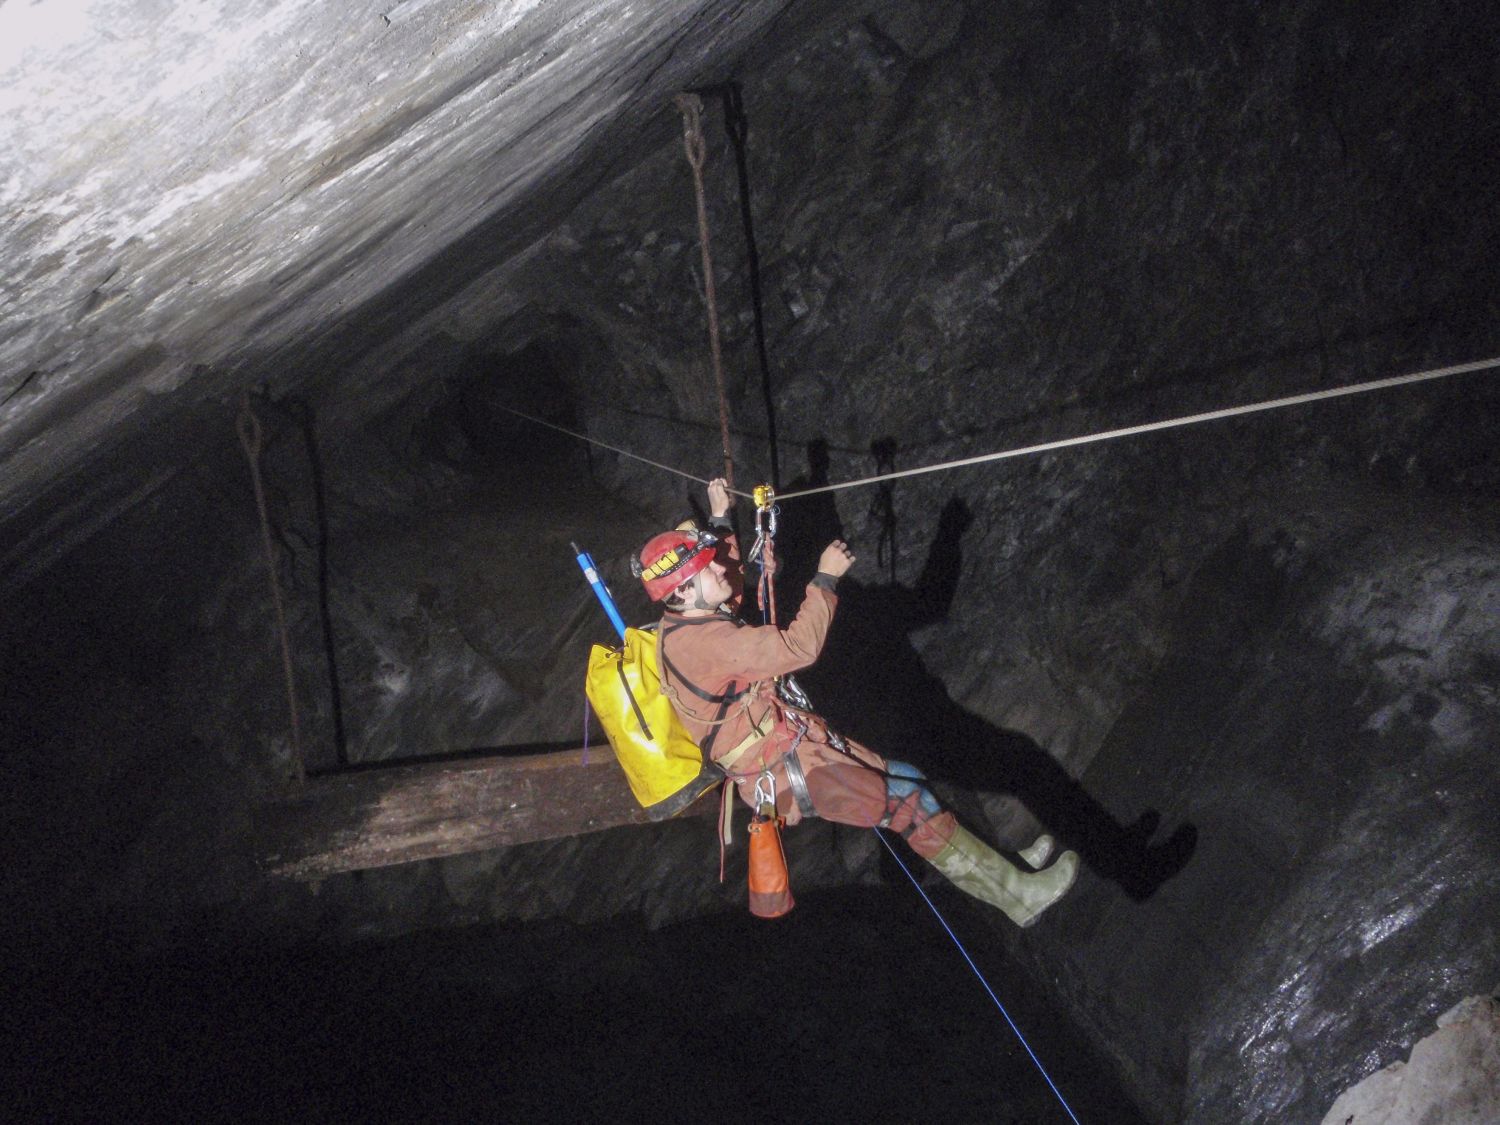
From the bottom of the pitch, continue downhill to the lake, the site of the original metal zip-wire. The zip wire was a 30m metal wire spanning the lake, but snapped in November 2017!!! This should be a reminder of the vulnerability of metal wires which can rust from the inside out!!!
Some generous person has since replaced the zip wire with a tensioned rope system, which we found to have been improved upon for our visit this year. There are now two well-tensioned ropes spanning the lake, one 8 inches above the other. These should be tackled ideally using two double pulleys (e.g. Petzl Tandem), one on each rope and joined by a krab between them. Not only does using two ropes reduce sagging in the middle of the line (and thus avoid a dunking in the water) but of course it also provides a backup if one rope snaps… a very real possibility given their tension!
If you only have one double-pulley then use the higher rope, and clip a cowstail into the other to trail behind as a backup; however, be prepared for a possible arse-skim across the water for anyone >75 kg as one rope will stretch much more than two and will sag more in the middle. Getting the pulley attached directly to your harness main maillion will keep you as high up as possible, although this may involve some acrobatics to get on and off the pulley at each side.
It is nonetheless an exciting few seconds zip across the lake; keep your fingers clear of the pulleys and rope (it is tempting to grab on to the pulleys or rope… don’t… keep hands out to your side).
For returning the pulley it is important to weight it with a couple of steel krabs so it doesn’t flip-up when unloaded (it is intrinsically top-heavy), which may prevent it being pulled back across the line. Attach the pulley system to some cord (at least 40m) and let that pay-out as the person zips across the rope; careful not to get your foot around it, or you’re going for a ride too! Use the cord to pull the pulley back for the next person; last across of course, remove the cord.
Immediately beyond the lake is a raised suspension bridge across a second lake; a splendid piece of work. On my first visit here 10 years ago this had collapsed into the lake, but was raised several years ago; again thanks to the folks making this possible.
Following the obvious stomping route on from here (on the left at the back of the cavern). This reaches after a few minutes (passing through several chambers with a choice of two routes) the first of three lakes that must be crossed. Ten years ago all three of these had reasonably sound bridges across comprising the original wooden supports; however, time and traffic has taken its toll on these.
This first bridge is the easiest as it still has a reasonably solid wooden strut all the way across it, which can be traversed while clipped into an in-situ safety line.
The second bridge has absolutely nothing to walk across at all and is consequently passed by a traverse on in-situ ropes around the outside of the lake. The first section is easy but the second bit is extremely strenuous indeed and it is quite hard to pull yourself up onto the ledge at the other side. Note that the in-situ rope on this second section is anchored by only one bolt!!! Check it carefully. Alternatively a rope is installed for use with a pulley to cross the lake, but again, the anchoring of this is dubious and it looked a bit saggy; treat with caution.
The third bridge has undergone extensive collapse over recent years. One wooden timber (reinforced by a ladder laid flat) is all that remains and I would not recommend using this as its days are numbered! Instead two metal wires, one to walk along and one to hold onto have been fitted for a high traverse, which is quite easy to use. I recommend clipping into at least two separate things though as the upper cable showed some serious rusting where it anchors to the middle section of the crossing and might break in future (remember the snapped zip line earlier). There was a separate rope spanning the crossing which was a good second belay point to put a long cowstail into.
Immediately beyond the third bridge, the main lake is reached, where one must abseil 4m down a fixed rope into a boat on a lake of pale blue water. The lake is 50m long, and the boats are pulled from one side to another by some in-situ polyprop cord. We found no boats waiting, however, on pulling on the cord, a Canadian canoe loomed out of the darkness, which I believe has been in place for several years now without sinking. It did the job absolutely fine, taking two people at once (you could maybe manage three). Carrying your own inflatable boat is nonetheless highly recommended in case anything ever happens to the canoe; it will no doubt sink one day! Ensure to have some buoyancy aids to hand in the boat (life jackets or an inflated rubber ring); falling into the icy water in SRT kits will not end well at all!
On the opposite side of the lake, dismount the boat and immediately ascend a 4m pitch (in situ rope) into the continuing passage. This passes two loose slopes going up on the right hand side. Taking the SECOND one is the way on, and at the top this soon reaches a wall where you cross over into Rhosydd mine. An old turntable at the bottom of a large incline is passed; there is some very intact winching gear at the top of the incline for those with the energy to go up there for a look.
Ignoring the incline, following straight on through a slate collapse in the main onward passage, which must be carefully negotiated to pop out into a huge chamber with daylight/moonlight visible from above. This is the way up to the Rhosydd Twll entrance. Exiting here is not recommended however; not only is the Twll depression remarkably hard to escape from (it is a steep sided crater) but also this deposits you on the middle of a featureless moor, and it is extremely hard to find the way back to the Croesor footpath in all but perfect visibility (which it never is up there).
Instead, climb a short distance up towards daylight (do not go straight down to floor level) but then at the far side of the chamber descend back down to floor level to the continuing mine passage. This reaches another chamber with light coming in from above, and a slope leading down on the left. Continue straight ahead into a final chamber with another slope leading down on the left; go down this second slope. Descend the slope until a passage leads off through a window on the right; take this passage to cross into a much bigger steeply descending passage which should be followed all the way to the bottom of the incline.
At the bottom, go right to join the Rhosydd stream (which may be dry in summer). The way out to Rhosydd adit is now left (downstream) along a perfectly straight passage for approximately 400m. Daylight is visible for the entire distance (if of course it is still light outside). For those seeking to explore however, there is lots to see in the other direction before you exit.
Exiting at Rhosydd adit, turn 90o left and walk for about 100m, though various collapsed mine buildings, to locate the main footpath to Croesor. Go left along this and follow for a few km. This footpath takes a lower route back along the valley than the original route you took up earlier. As you approach Croesor village, a stile/gate on the right leads down through a field towards a house and the road leading into the village.
In poor visibility/the dark the navigation coming out of Rhosydd can be disorientating. A GPS programmed to Croesor village or mine entrance is useful, the latter particularly so if needing to return there to pop in and derig any of your own ropes that you installed on the two pitches.
Essential equipment for the trip (other than standard caving gear especially including gloves and SRT kits) includes:
(A) Steel double pulley (two ideally for optimum performance, but one is sufficient)
(B) A steel karabiner each (to clip into metal wires, and to use to weight the pulley to prevent it flipping upside down when nobody is on it when pulling back across the lake).
(C) A couple of slings; no specific purpose but useful to have.
(D) 45m of cord, string or fishing line, ideally on some kind of reel for very quick reeling out on the zip wire (this needs to automatically reel off so the person holding it doesn't get their hand ripped off when someone launches themselves across the zip line).
(E) 2 x 30m ropes and some krabs/maillions (7-8) to rig the two pitches in the event that the in-situ rope is found to be defective.
(F) A 15m emergency rope and a buoyancy aid (lifejackets or rubber ring) in case anyone falls into some water.
(G) Inflatable boat with pump in case the in-situ canoe isn’t there.
(H) GPS to fix the Croesor entrance or Croesor village in case of poor visibility on exiting.
Simplified walkthrough:
(A) From the entrance adit follow obvious route straight ahead, across a large wide chamber then climb up the walled structure and to the top of the long steep slope.
(B) First pitch at top of slope on the left (in-situ rope; check carefully or install your own).
(C) Scramble through huge chamber to second pitch under huge archway on right (in situ rope but again, check carefully and install your own if needed).
(D) Lake is immediately reached 30m from bottom of second pitch; use double pulley(s) to cross; see details above for recommended strategy.
(E) 10m Lake is immediately reached; cross via in-situ bridge.
(F) Follow obvious stomping mine tunnel at back of chamber on left for a few minutes (via several very large chambers; a choice of two routes) to first bridge, easy traverse.
(G) Next bridge soon reached; this is now a hanging traverse around the right side (awkward).
(H) Final bridge is then reached, less of a bridge and more of a high wire traverse. Clip into rope as well as metal wire due to some severe rusting on the wire observed.
(I) Final lake is immediately reached; abseil into boat (in situ canoe, but take your own inflatable just in case) and cross lake.
(J) Prussik up 4m on in-situ rope beyond the lake.
(K) Ascend the SECOND steep sloping passage on right.
(L) Follow main route past a knocked-through wall and then turntable with incline on right (ignore). Then crawl through a slate block collapse in the main passage into huge chamber with light entering from the Twll entrance above; ascend chamber a little and cross to far side, before descending to floor level and ongoing passage.
(N) Follow passage through two more open-air chambers; take the SECOND descending passage on the left (in the second chamber).
(O) Take passage through window on right part way down the slope to cross over into another steeply descending incline; follow all the way to the bottom.
(P) Turn right to meet Rhosydd adit passage; then go left (downstream) and follow in perfect straight line for 400m to the exit.
More articles
North York Moors valley to valley trip becomes a reality
By Matt Ewles | 13 Apr 2026
Exploration of the Excalibur MEGA extensions
By Matt Ewles | 14 Aug 2025
Excalibur streamway extended!
By Matt Ewles | 7 Aug 2025
Jenga vocally connected to River Dove valley!
By Matt Ewles | 24 Jul 2025
Dan-yr-Ogof Far North
By Matt Ewles | 27 May 2025
Brown Hill Pot
By Matt Ewles | 22 Apr 2024
Sunny Bank Holiday in Wales
By Matt Ewles | 5 Jun 2023
Avoiding the January Blues in Rift Pot
By Tash Durham | 16 Jan 2023
North Wales Slate Mines 2022
By Matt Ewles | 5 Dec 2022
Long Churn beginners trip. 10th October 2022
By Conor Morrison | 11 Oct 2022